
I am so very honoured to have made it to round two in the Kaisercraft Design Team Application. It is my first time making it this far, so when the pizza sized box arrived at my door the delivery man was a bit hesitant to hand it over as I almost deafened him with my excited squeals. Now, this post is going to be mighty long so before you start getting into it I suggest you grab a cuppa or glass of wine, sit back and read along. I seriously loved the subtle hues and tones of the blues, greens and purples in this Kaisercraft Lilac Whispers Collection - I do believe that it is due to be released in July so make sure that you get your hands on some.
Too Pretty Not to Use it ALL!!!

I ummed and arred over what to create using all the beautiful products that came for round two, I thought about doing an off the pages creation, but I stayed true to myself as I am mainly a 12x12 layout kinda gal. So I created five layouts and a decorative jar with some of the collection, I still have ample left over to keep playing for a while more too. I must admit that I made the jar for a specific purpose.... my eldest daughter Bronte's hair ties are driving me insane!!! I am finding them all over the house and I wanted to give her something that was beautiful, in the hope that she keeps them all in one place.
BeYouTiful

For my first layout I was inspired by the Mini Designer Template - Blossom, with its tiny delicate flowers I wanted to try out a subtle technique for a textured background.

On the Coconut Weave Cardstock I spread some clear gel medium through the template.

I placed it randomly over the cardstock base so that little pockets of flowers would appear across the page.

Once the clear gel was dry I sprayed some Envy Colour Blast Shimmer Spray over the top of the flowers,

then using the straw in the bottle of Indigo Colour Blast Colour Spray I flicked the darker colour over the Shimmer Mist. Once dried I used a baby wipe to take off the excess spray from the gel medium, bring it back to white.

Using a Martha Stewart boarder punch I popped out a strip of butterflies from the Jade patterned paper.

I jumped on my sewing machine and gave the cardstock some texture by sewing around the edges and sewing two circles.

Whilst sewing I placed the butterflies punched paper along two small parts of the edges and sewed over the top of them.

Now it was time to get a bit rough with the cardstock. I tore up three of the edges, I rolled and folded them to give them some dimension. Whilst doing this if you spray the cardstock with water it holds the folds, rolls and pleats in place. When the watered cardstock was dried I adhered some of the Echo patterned paper under the torn edges, making the back ground a whole 12x12 piece again.

I wanted to add a bit more texture to the layout so using my decorative die in the shape of a butterfly I cut out some shapes from corrugated cardboard

and the second delicate detail die from the Jade patterned paper.

When I saw the word "beautiful" in the die cuts set I knew what I wanted to do with it - I cut it apart to only use some of the word - the "be" and the "tiful" ..... you will just have to scroll back to the finished title to get the whole effect. :)

Next up I matted my photo with some of the reverse side of Jade pattern paper and a paper doily. I added small green squares of the reverse side from the Hydrangea patterned paper and used them as a guide for placement, I built up the embellishment clusters. Starting with some twine which I twisted into circles. Then I added the corrugated butterflies with some dimensional tape to help build depth.

I kept building the clusters by adding some of the foliage leaves in the die cuts and the wood veneer.

I finished them off with some small strips of the sticker boarders, the tiny butterfly die cuts and some Sage mini paper blooms.

I really liked how the page came together, lots of layers, texture and an very delicate look.

Here you can see the final title - BeYouTiful - a bit of a play on the word.

I ran the top embellishment cluster off the page as I think it helped to add depth to the page.... I just couldn't bring myself to trim it off in the end. You can also see where I have placed the blue from the Echo patterned paper under the torn cardstock on the edges.

Here you can see all the layers on the page, which helps to draw your eye across the whole page.
Kaisercraft Products Used
Lilac Whispers Collection;
Pattern Paper - Jade P2349, Echo P2346
Cardstock - Coconut Weave CD101
Corrugated Cardboard - CB153
Sticker Sheet - SS342
Die Cut Shapes - CT885
Mini Paper Blooms - F649
Wood Veneer
Paper Doilies - EM405
Mini Designer Template - Blossom - IT011
Decorative Die - Butterflies - DD503
Other Products Used
American Craft Thickers - Burlap
Colour Blast:
Colour Shimmer Spray - Envy
Colour Spray - Indigo
Prima Finnabair Art Basic - Transparent 3D Glass Gel
Frenchville - Twine
Martha Stewart - Butterfly Boarder
Life Happening

For my second layout that I am sharing I was inspired by the delicate Hydrangea flowers on the patterned papers - they are just so light and delicate and remind me of my daughters when they were younger, so I knew that I wanted to use this photo of Paige when she was about 3 years old.

The corner design on the Illusion pattern paper drew my eye, I knew that I wanted to make it a feature on my page so I cut a quick title circle on my Silhouette Cameo with the Elephant Ears Cardstock.

Using a sharp blade I cut around some of the patterned paper flowers so that I could slip the cardstock circle title underneath them.

Next I cut the individual flowers out from the large flower cluster on the sticker sheet.

I used 3D tape around the outer edges of the sticker sheet flowers,

which I turned over and adhered over the top of the flowers printed in the corner of the patterned paper.

I pressed the centre of the stickers down so that they adhered with a dip in the middle for some extra movement on the layout.

I then painted the wood veneer hearts with some Colour Blast Colour Paste, which added a nice gloss finish to the wood veneer.

After I had built up the flower stickers in a few areas I cut apart one of the word strips from the sticker sheet and used it as a quote on my page.

For the final touch on this layout I heat embossed one of the Magical Butterflies from the Wooden Flourish pack and adhered it along with the wood veneer hearts to the page. This layout came together really quickly and although it isn't complicated to do it looks like there is a lot happening with the different layers and the main focus of the photo in the center.

It is easy to create a simple cluster with just two elements with the Lilac Whisper Collection as the details in the Hydrangeas tricks the eye into believing that there is more there then there actually is.

Here you can see that I have cut the sticker word strip apart to make it fit onto the page exactly where I wanted it. The great thing about the sticker sheets are that they are so versatile and easily manipulated to create the perfect element to any page.

Just buy adding one embellishment that has a little bit more detail in it than every thing else on the page adds interest and keeps you eye moving looking for more.

The layering of the sticker sheet and using 3 dimension tape gives the layout height and keeps interest flowing.
Kaisercraft Products Used
Lilac Whispers Collection;
Pattern Paper - Illusions P2345
Cardstock - Elephant Ears CD104
Sticker Sheet - SS342
Wood Flourishes - Hearts FL440, Magical Butterflies FL341
Other Products Used
Silhouette Cameo Diecutting Machine
Colour Blast:
Colour Shimmer Paste - Lovely Lilac
Colour Embossing Powder - Envy
Beautiful

For this layout I drew inspiration from my daughters personality - although she is a real girlie girl she is one of the messiest people I know. Whether it be messy eating, messy bedroom or as in this photo messy hair!! To represent that I wanted to create a beautiful mess and the Opal patterned paper from the Lilac Whispers Collection just called me to use it.

First up I used a dry paint brush to lightly coat a rough messy layer of white gesso onto a 12x12 pieces of corrugated cardboard.

Then I randomly painted sections of the corrugated cardboard with transparent gel medium, which I used as a glue to

adhere the pattern paper to.

Once the gel medium was dry I peeled away pieces of the patterned paper to reveal the corrugated cardboard underneath.

I adhered two of the paper doilies to the base to use as a photo mat,

I also tucked some small off cuts of the paper doily underneath the patterned paper.

Where the patterned paper was not secured to the corrugated cardboard enough I decide to wet and roll up the edges to reveal some of the reverse side pattern, giving it more texture.

I trimmed off a 6 millimetre square off of the Mist patterned paper and ran it around the edge of the corrugated base, I tucked it underneath any of the Opal patterned paper that was adhered to the very edge.

Here you can see what my base looks like before I started to embellish it.

Using the word title "beautiful" that I had cut with my Silhouette Cameo from the Sage Cardstock I decided where I wanted to place it. As you can see in this photo above I like the placement but the word did not stand out enough for me

so I used some of the reverse side of the torn off patterned paper I ran a strip horizontal creating a base to anchor the title to.

Next I placed some of the die cuts around the page, tucking them under edges and using 3 dimensional tape to create height.

I fussy cut out some of the flowers from the Hydrangea patterned paper and used them as embellishments across the page.

Using some more 3 dimensional tape I anchored some of the circle word stickers from the sticker sheet to start my element clusters.

Where I added threads of bandage gauze, mini paper blooms and die cuts. I finished off the page with some gems that have been in my stash for ages.

I love pulling out old forgotten items and teaming them with new products, it gives them a new lease on life.

By adding small amounts of loose thread or bandage gauze to embellishment clusters adds texture and helps to tie them together.

Wrap the green wire stem of the small paper blooms around a wooden skewer and slide them off to create a cute little twirl.

Here you can see how I made the word title stand out more on the page and not become lost in the background.
Kaisercraft Products Used
Lilac Whispers Collection;
Pattern Paper - Opal P2346, Mist P2347, Hydrangea P2342
Cardstock - Sage CD157
Sticker Sheet - SS342
Paper Doilies - EM405
Gems - light purple
Mini Paper Blooms - Sea Breeze F648
Other Products Used
Colour Blast: Heavy White Gesso
Matisse Gel Medium
Happy

The inspiration for this layout came from the patterned paper - Mauve - once side had a lovely grey white leaf pattern and the other had this pattern paper with rectangles and squares on it. It was very different to all the delicate flowers on the rest of the papers, the ridgness (is that even a word?) of the straight lines in the pattern; teamed with the flowers got my interest.

Here you can see the rectangle with the flowers - such an interesting combination.

Because I was inspired by the rectangles and square the Well Wishes paper also called me - I started my layout by choosing some of the rectangle sayings on the cut-a-part sheet.... so I literally just cut it apart.

I also cut a few extra squares and rectangles with the Silhouette Cameo and cut the centre words out of the framed die cut.

Next I just played with the placement of where all these squares and rectangles would go.

Once I decided on the placement I took them off one by one and inked the edges and adhered them to the page.

I created different levels on my page by using a mixture of 3 dimensional tape and flat double sided sticky tape.

Next I embellished my page using some wood veneer.

I added some delicateness back into the page by using the tiny sticker flowers from the sticker sheet.

So this layout is built using ridged shapes but due to it being teamed with the subtle colours and the delicate fine details of the floral on the patterned paper it seem very soft and feminine.

Here you can see one of the word frames (under "Joy") from the die cuts, I cut out the centre word to use just the frame.

Using one of the die cuts as a quick journaling base helps to build up those layers and gives a quick way to tell viewers about the photo.

Just a little flower, yet it adds so much to the page.
Kaisercraft Products Used
Lilac Whispers Collection;
Pattern Paper - Mauve P2344, Echo - P2350
Cardstock - Elephant Ears CD104
Sticker Sheet - SS342
Wood Flourishes - Hearts FL440
Wood Veneer Pieces
Other Products Used
Zig Marker
Color Vesta - Dark Grey
Blossom

How could I use any of the Lilac Whisper Collection without all the flowers creeping into my inspiration?? Well I couldn't - this layout was inspired by the flowers and I was just itching to use what was left of the Hydrangea patterned paper and fussy cut it all up....and that is exactly what I did for this layout.

First up I cut out a boarder from the Mist patterned paper and adhered it to just inside of the White Wood paper.

Once again using th Silhoutte Cameo I cut out a title, a heart, some leave and the word beautiful (which I used in the layout earlier in this post).

Next it was fussy cutting time.

Once the flowers were all cut out I placed the heart onto the White Wood patterned paper and statured adhering the flowers down, I tucked some under and layered some over the top of each other and the heart shape.

Once I had filled up the heart with flower I place my photo on to the page and uses some of the sticker sheet stickers as the start to my embellishment clusters.

I adhered the title "blossom" across the bottom of the photo with 3 dimensional tape to add height.

Then I finished off my embellishment clusters with Mini Paper Blooms, Paper Blooms, Die Cuts and Stickers from the sticker sheet.

I love adding depth to my pages so I layered the die cut butterflies on top of the Paper Blooms.

When I was looking for photos to use with this Lilac Whispers Collection I noticed that it looked stunning with coloured or black and white photos - although I ended up just using colour photos I did have a pile of black and whites sitting right on my table and I really liked how the tones and hues of this collection allow you to work with both.

A small sample just some of the beautiful flowers that are in this stunning collection.

Using the Paper Blooms to add dimension to the page.

By folding the centre of the die cut butterflies and adding the adhesive to the centre, under the body of the butterfly it creates the illusion of flight.
Kaisercraft Products Used
Lilac Whispers Collection;
Pattern Paper - White Wood P2348, Mist P2347, Hydrangea P2332
Cardstock - Sage CD157
Sticker Sheet - SS342
Die Cut Shapes - CT885
Mini Paper Blooms - Sage F649
Paper Blooms - Amethyst F643
Decorative Jar

Well if you are still with me, I thank you and for something different from me an off the page project. I only do these every now and then, which is strange as I really enjoy them I just tend to stick to my 12x12s. But anyway this Jar was inspired by necessity - I needed somewhere for my daughter Bronte to put her hair ties.... and I really, really hope that by having something this beautiful will inspire her to be a little less messy and keep them all in one place.

I used the reverse side of Well Wishes patterned paper and cut a lace boarder with the Silhouette Cameo and ran it though Xyron Sticker Maker,

which I adhered to the top of a Moccona coffee jar.

Next I popped the plastic seal off the lid of the coffee jar and

built up a small cluster using two paper blooms, some cardstock leaves cut from the Silhouette Cameo and a wooden flourish butterfly.

I then sealed it back into the jar lid.

Next I stuck two of the board strips from the sticker sheet to the coffee jar.

Using a hot glue gun I built up a large embellishment cluster with bandage gauze, paper blooms, paper doilies,

cardstock leaves and wooden flourish butterfly and small flowers.

A few final touches with some die cuts.
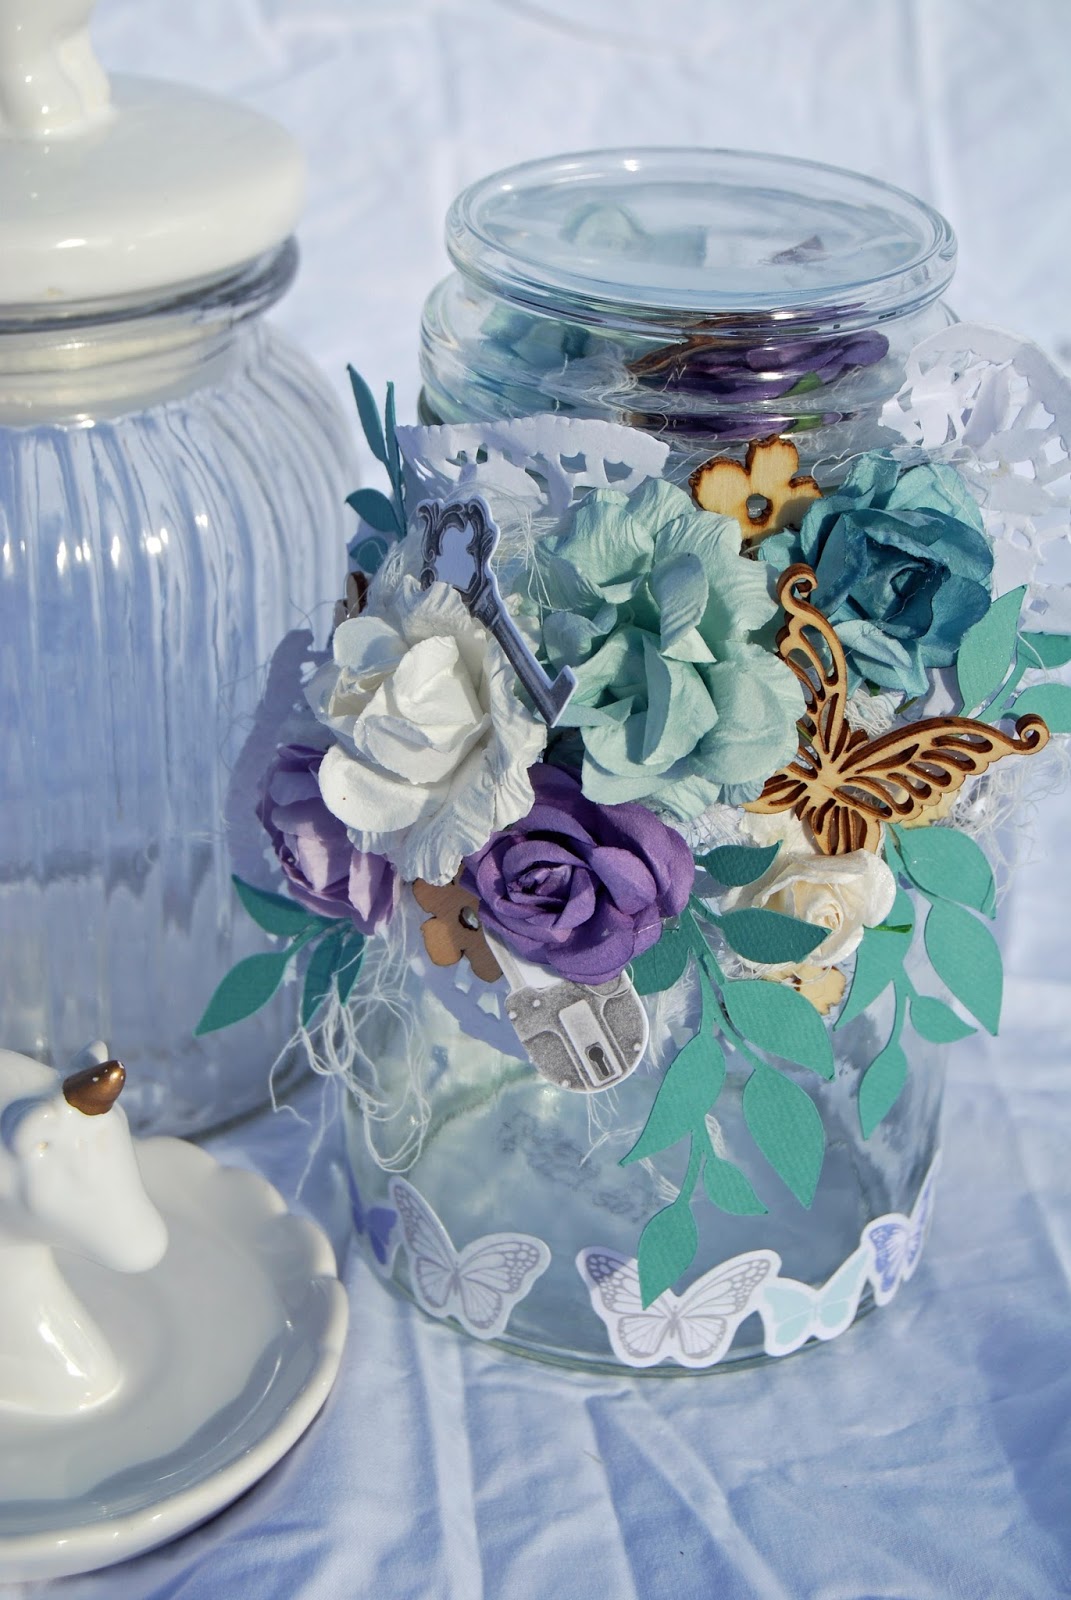
It was such a simple way recycle an old coffee jar and give it a new purpose (hopefully it does the trick). The colours in the Lilac Whisper Collection are the perfect combination for young and elder ladies alike.... I am sure that Bronte will love it.

The clear glass lid on the coffee jar makes a perfect space for an embellishment cluster.

Kaisercraft Products Used
Lilac Whispers Collection;
Cardstock - Sage CD157
Sticker Sheet - SS342
Wood Flourishes - Magical Butterflies FL341
Wood Veneer Pieces
Paper Blooms - Amethyst F643, Iceberg F630, Coconut F627
Paper Doilies - EM405
Die Cut Shapes - CT885
Well as Porky Pig says - That's All Folks. Thanks for stopping in and looking at my application for the 2017/18 Kaisercraft Design Team, I really hope that you have enjoyed my post and that I have inspired you to go and purchase some.... or all....of this collection when it is available in stores. Please keep your fingers crossed for me and I wish everyone else who is also applying for the team good luck.
4 comments:
Congratulations! Wonderful creations - you have been busy! All the best of luck.
Louise xo
Awesome projects !! Good Luck
A lot of lovely work....good luck
Beautiful projects. So many!! Wishing you the very best of luck xx
Post a Comment